
HYDROPONICS II-THE HOME WATER GARDEN
Kadambini Alva P.
Advisor
The Biotalk Magazine
For those who want to start a garden but don’t have a patch of dirt, the answer to their woes might be hydroponics. Like discussed in the previous article, this technique swaps soil for nutrient rich water, requires minimal space, uses 90% less water and grows faster than traditional methods.
To elaborate further, this article will throw light on how easily you can establish this setup at the comfort of your home with all the household items. There are various methods to start a simple hydroponic setup at home to establish the herb garden. This article will discuss two easy options with a basic yet effective setup.
1. DEEP WATER NUTRIENT SYSTEM
What you’ll need:
o Coffee container or a food grade bucket with a lid
o A knife or a drill with two-inch circle bit o Air tubing
o Nutrient mix for hydroponics
o Seedlings
o Rockwool cubes o Air pump
o Air stones
o Net cups
(all of these materials are easily available at local hardware stores and plant nurseries)
• If you have a coffee container, you’re going to want to cut or drill a hole that is two inches in diameter. If you’re using a larger bucket, you can drill up to four holes, just leave a little more than two inches of space between them.
• Clean up any plastic scraps off the lid and any that may have fallen into your bucket or container.
• Drill or cut a small hole about an inch to half an inch away from the edge of the lid. This hole will be for your air tube, so ensure that it is roughly the same size in diameter or even slightly smaller. If you’re using an exacto knife, make a tiny “x” that you can poke the air tube through.
• Feed about six inches of air tubing up through the hole in your lid that you just made. Attach the airstone by sliding it onto the end of the tube. This will sit in the bottom of your bucket or container.
• Fill your container with water so that is about three quarters full. Mix in your grow solution. You can purchase the grow solution at any greenhouse or home and garden store. The directions on the solution will tell you how much you need to put in.
• Hook up the end of tubing that is not inside the bucket to your pump. There should be a single valve on the front of the pump that you can plug your tubing into.
• Take one Rockwool cube and put one in each net cup with your seed or seedling in the top of the cube. There is a tiny hole in each cube that allows for the seed or seedling to grow. It’s important that before you plant your seed or seedling that you’ve soaked your Rockwool cubes in water. When the cubes are moist, your plant babies absorb the water. A seedling that is about two inches tall with true leaves is a good size for transplanting into your system.
• Place your net cups in each hole. Double check that there is enough water in your container that the bottoms of the cups are immersed in the water.
• Plug in your pump and turn it on. You will want to leave the pump on the entire time because it ensures that you plant roots get the oxygen they need. If they don’t get oxygen, they will drown.
Keep this contraption in a well-lit area, ideally in front of a window that can provide 10-11 hours of sunlight. A temperature that is above 60 °F will allow your garden to thrive. It’s also best to change the water solution every one to two weeks.
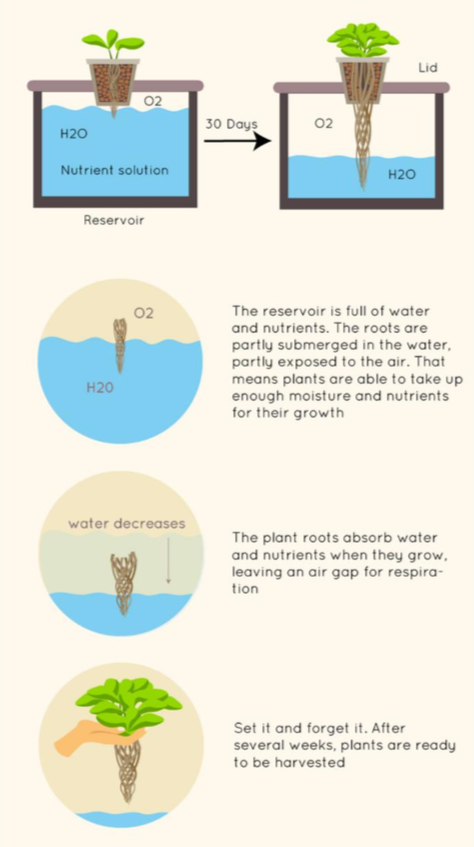
2. THE KRATKY METHOD
What you’ll need:
o Mason jar
o Rockwool cubes
o Seedlings
o Net cups
o Clay pebbles o Paper
• Drop each net cup into the top of the Mason jar. The lip top of the cup should be resting comfortably on the top of each jar.
• Mix your water and grow solution in a separate container and pour enough into each jar that it reaches the just bottom of the net cup. Because this system does not have a pump or air stone, you are filling less of the container so that your plant roots have some exposure to air.
• Place each Rockwool cube with your seedling. As previously discussed, ensure the Rockwool is soaked in water before your seeds are planted. The best time for a seedling to be transplanted
is at about two inches tall with its true leaves intact.
• If your Rockwool cube doesn’t fill up your net cup, use your clay pebbles to take up extra space around the cube. They will also be helpful in blocking out light that comes in from the top of the net cups. If there is light that hits the water, it can result in algae growth inside your container.
• Cover all your jars with paper so that there is no glass exposed. You can tape the paper against the jar to ensure it stays in place. This will also prevent algae growth.
• Cover all your jars with paper so that there is no glass exposed. You can tape the paper against the jar to ensure it stays in place. This will also prevent algae growth.
Depending on the plants that you are growing, the ideal pH level in the water will be different. The appropriate pH level depends on the type of plant you’re planning to grow. If you notice your plants aren’t thriving, then that level is likely off, you can check your pH using a test kit that is available to order online, in hardware or home garden stores.
Reference (Aug-20-8)
